Fixing unsupported characters and incorrect font sizes for Linux versions of Source games. GameBanana TF2 mod page
Preface
It is recommended that Windows fonts are installed before following the other instructions in this guide. Doing so also ensures the fallback DejaVu Sans (which is drawn way too small) is not used for any previously missing fonts. Instructions for Arch Linux are available in this ArchWiki page. You may use free fonts instead (please suggest some!), but especially in the case of the fallback font, you need to know what to look for.
Different Source games have slight variations in file locations and contents, but it is roughly the same procedure for every Source game using VGUI based on HL2 resources.
Team Fortress 2 font issues have been fixed in an official capacity. Instructions are being kept in the guide for use in older versions of the game.
Special thanks to SvicidalBug for pointing out issues in previous versions of this guide.
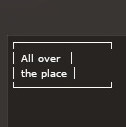
Missing Glyphs
| Before | After |
|---|---|
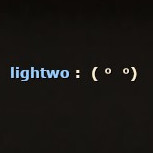 |
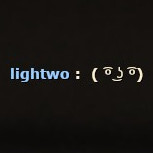 |
Instructions
Either:
- Install WenQuanYi Zen Hei font (wqy-zenhei). It's the hard coded fallback font used by the game for unsupported characters
- Replace that font with Tahoma, the default fallback font for the Windows version of Source
- Obtain tahoma.ttf. Read the ArchWiki page for some methods
- Install and launch FontForge
- Edit tahoma.ttf
- Navigate to Element > Font Info...
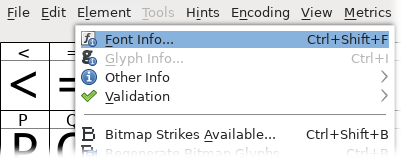
- Under PS Names (default pane), change Family Name to WenQuanYi Zen Hei, confirm with OK

- Navigate to File > Generate Fonts...
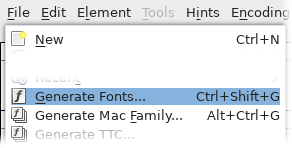
- Make sure Show Hidden Files is checked
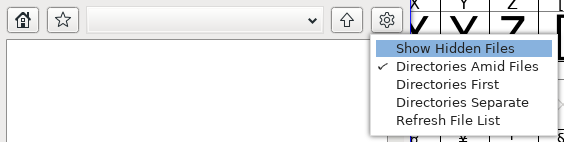
- Navigate to Home > .local > share > fonts and enter the desired name, untick Validate Before Saving and press Generate

Note that alternative free fonts may be used instead of Tahoma, in which case use a font with a large character set
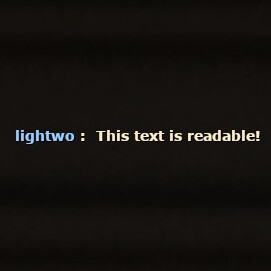
Chat Font
| Before | After |
|---|---|
 |
 |
Instructions
- Obtain chatscheme.res
- Half-Life 2 and games with light UI modifications
- Enter the game directory
- Hover over the game in your Steam Library
- Navigate to Context menu > Manage > Browse local files
- Either use the file manager window or copy the path and use it in the terminal
- Copy chatscheme.res from hl2 > resource into custom > (new directory) linux_fixes > resource
- Enter the game directory
- Team Fortress 2
- Install vpk_fuse
- Enter the game directory using a terminal
- Hover over the game in your Steam Library
- Navigate to Context menu > Manage > Browse local files
- Copy the path and use it in the terminal
cd "<paste here>/tf"
- Enter these commands:
mkdir -p working custom/linux_fixes/resource cat >custom/linux_fixes/info.vdf <<EOL "linux_fixes" { "ui_version" "3" } EOL vpk_fuse tf2_misc_dir.vpk working cp working/resource/chatscheme.res custom/linux_fixes/resource umount working && rmdir working - In the following steps, use the path it was copied to (under custom > linux_fixes > resource)
- Half-Life 2 and games with light UI modifications
- Edit the chatscheme.res copied earlier using your preferred text editor
- Search for ChatFont.
What the section should look like:"ChatFont" { "1" { "name" "Verdana" "tall" "12" [$WIN32] "tall" "15" [$X360] "weight" "700" "yres" "480 599" "dropshadow" "1" } "2" { ... } ... } - For each preset (under "1" through "5"), add [$LINUX] overrides (must be above defaults):
"name"      "Verdana Bold" [$LINUX]
"tall"      "<replace me>"  [$LINUX]    // = [$WIN32] + 3
Optionally replace Verdana Bold with a desired font (should be the bold variant since "weight" is broken for TTF fonts), and replace as instructed
Console Font
| Before | After |
|---|---|
 |
 |
Instructions
- Obtain sourceschemebase.res
- Half-Life 2 and games with light UI modifications
- Enter the game directory
- Hover over the game in your Steam Library
- Navigate to Context menu > Manage > Browse local files
- Either use the file manager window or copy the path and use it in the terminal
- Copy sourceschemebase.res from hl2 > resource into custom > (new directory) linux_fixes > resource
- Enter the game directory
- Team Fortress 2
- Install vpk_fuse
- Enter the game directory using a terminal
- Hover over the game in your Steam Library
- Navigate to Context menu > Manage > Browse local files
- Copy the path and use it in the terminal
cd "<paste here>/tf"
- Enter these commands:
mkdir -p working custom/linux_fixes/resource cat >custom/linux_fixes/info.vdf <<EOL "linux_fixes" { "ui_version" "3" } EOL vpk_fuse ../platform/platform_misc_dir.vpk working cp working/resource/sourceschemebase.res custom/linux_fixes/resource umount working && rmdir working - In the following steps, use the path it was copied to (under custom > linux_fixes > resource)
- Half-Life 2 and games with light UI modifications
- Edit the sourceschemebase.res copied earlier using your preferred text editor
- Search for ConsoleText.
What the section should look like:"ConsoleText" { "1" { "name" "Lucida Console" [$WINDOWS] "name" "Lucida Console" [$X360] "name" "Verdana" [$POSIX] "tall" "11" [$OSX] "tall" "14" [$LINUX] "tall" "10" "weight" "500" } } - For the preset "1", add the [$LINUX] override:
"name" "Lucida Console" [$LINUX]
Optionally replace Lucida Console with a desired, preferably monospace font
Comments
There are no comments yet.